Saludos y bendiciones, mi gente linda de @needleworkmonday. Un gusto visitarlos, espero que hayan iniciado la semana con ánimos y alegría de que haremos muchas cosas buenas y lindas. Por mi parte, estoy haciendo un proyecto con telas, pero no es ropa. Ya les estaré mostrando próximamente.
Hoy les vengo a mostrar cómo estuve haciendo un lindo vestido para mí, lo hice para usarlo el día de la comunión de mi princesa @arianna y mi esposo. Por cierto, luego les muestro cómo quedó lo que le hice a ella.
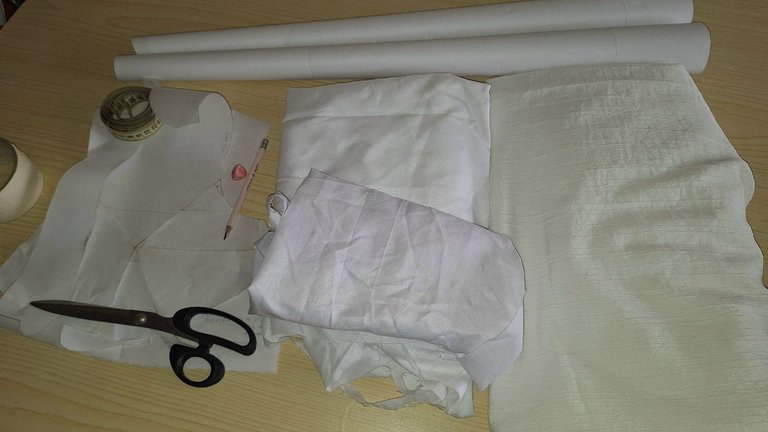
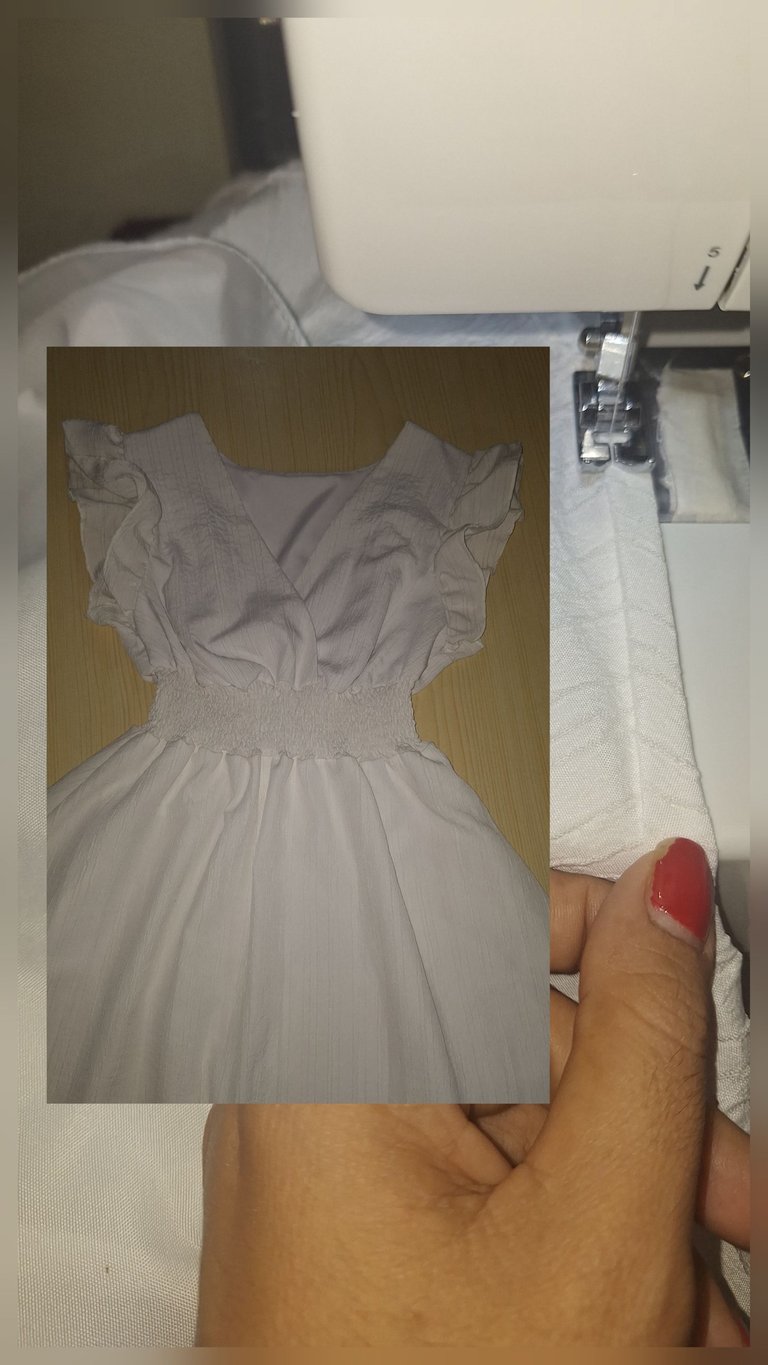
Escogí este modelo porque se veía fácil de hacer y quería aprender hacer el patrón del corte imperio, utilicé una tela muy linda, fresca con textura y de un color blanco ostra, también use otra tela blanca para el forro, en sí utilice 2 tipos de tela para el forro, no llevo ni cierres ni botones, pero sí hilo elástico.
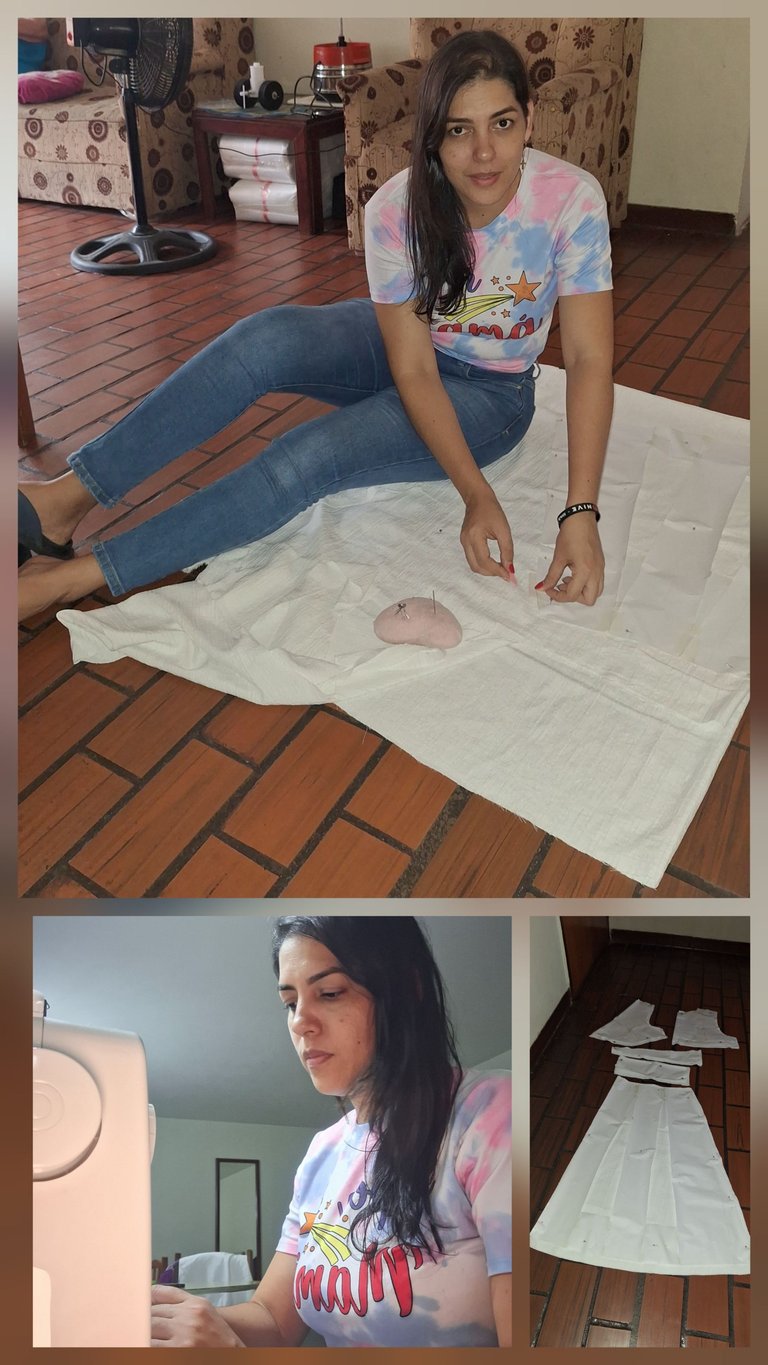

Usé mi patrón base de blusa y lo transformé en el corte imperio. No tenía mucho papel, así que estuve empatando por aquí y por allá, je, je, je, pero se logró el objetivo de hacer este nuevo patrón.
Luego lo marqué en la tela con mi tisa, para después cortar tanto la tela principal como los forros, de la parte de la blusa, como de la falda. Por cierto, este patrón quedó como un esqueleto de tanto empate. También saqué la cintura y las pequeñas mangas.
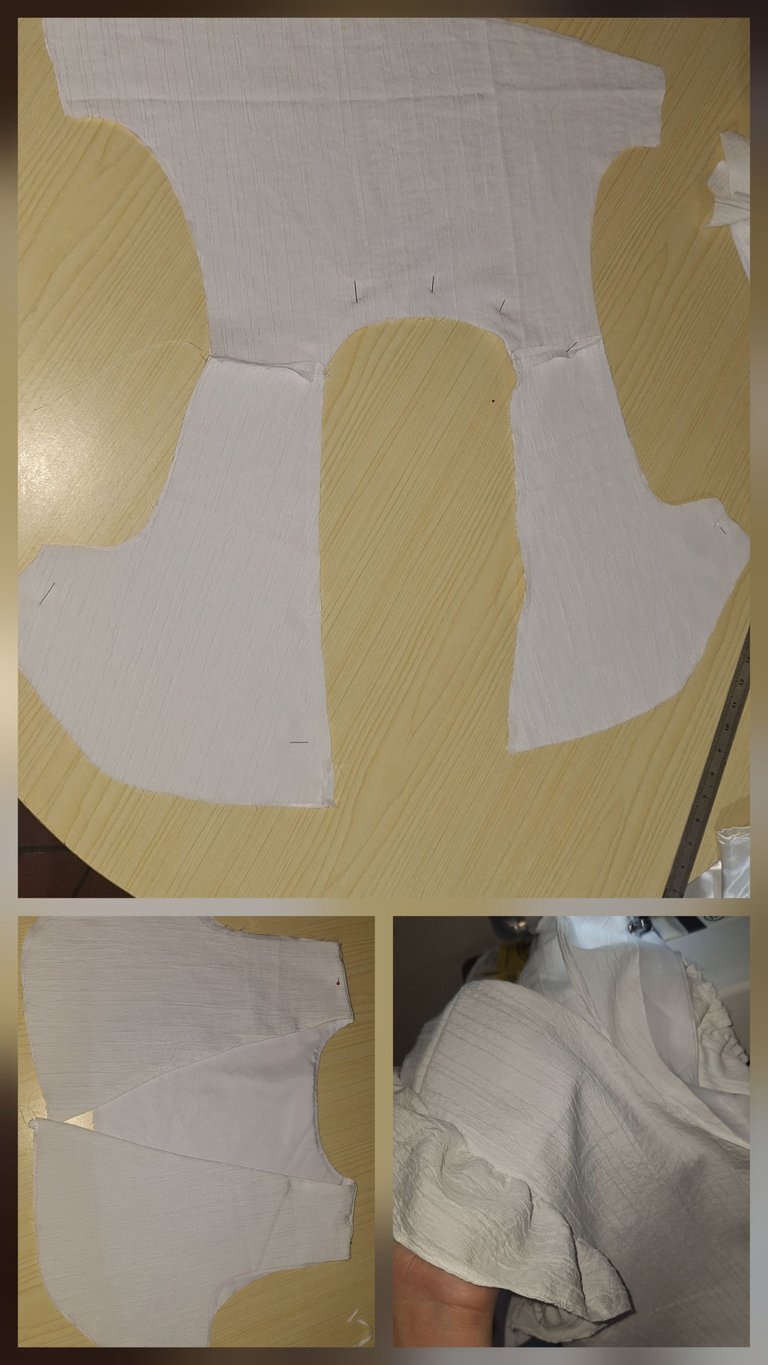

Luego empecé a coser cada una de las piezas, primero la blusa con su forro, como se ve en las imágenes. Para hacer las mangas, primero le hice ruedo, la fruncí con doble costura y luego uní a los hombros.
Luego me enfrenté al primer y único desafío en este proyecto: pasar la costura elástica por primera vez. Por suerte hice el embobinado bien, pero así como todas las piezas, la pretina era con forro. Al coser con el hilo elástico las dos telas, estas no se escogían, es decir, no se hacía el efecto deseado al colocar hilo elástico.
Pasé bastante rato, practicando y nada que lo lograba. Lo que tuve que hacer fue descoser el forro y coser con el hilo elástico solo en la tela principal y, por fin, si quedó bien lindo. Aunque las líneas no me quedaron tan derechas, tuve que llenar el carrete varias veces.
Luego cosí la parte de la falda, la uni a la pretina o cintura y quedó listo mi vestido, aunque pensé que lo haría más rápido, dure 2 días en eso, pero a pesar de todo es lo que he hecho más rápido y sin tantos contratiempos.

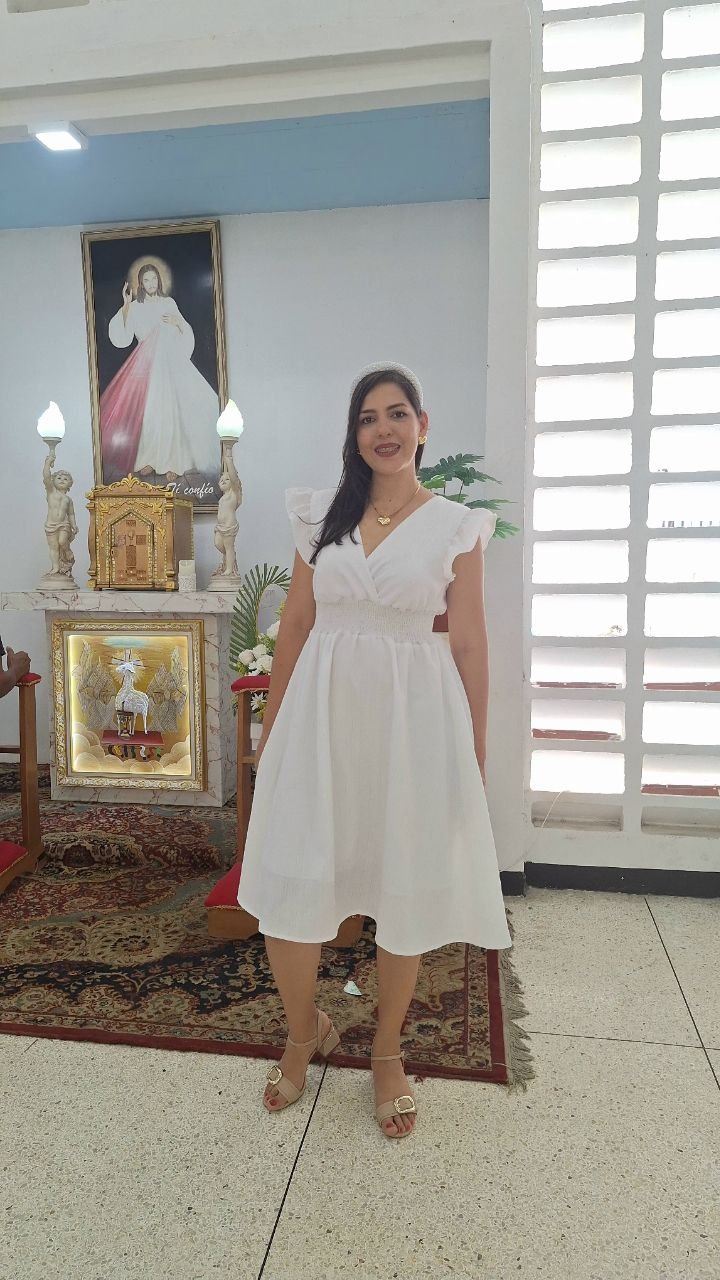
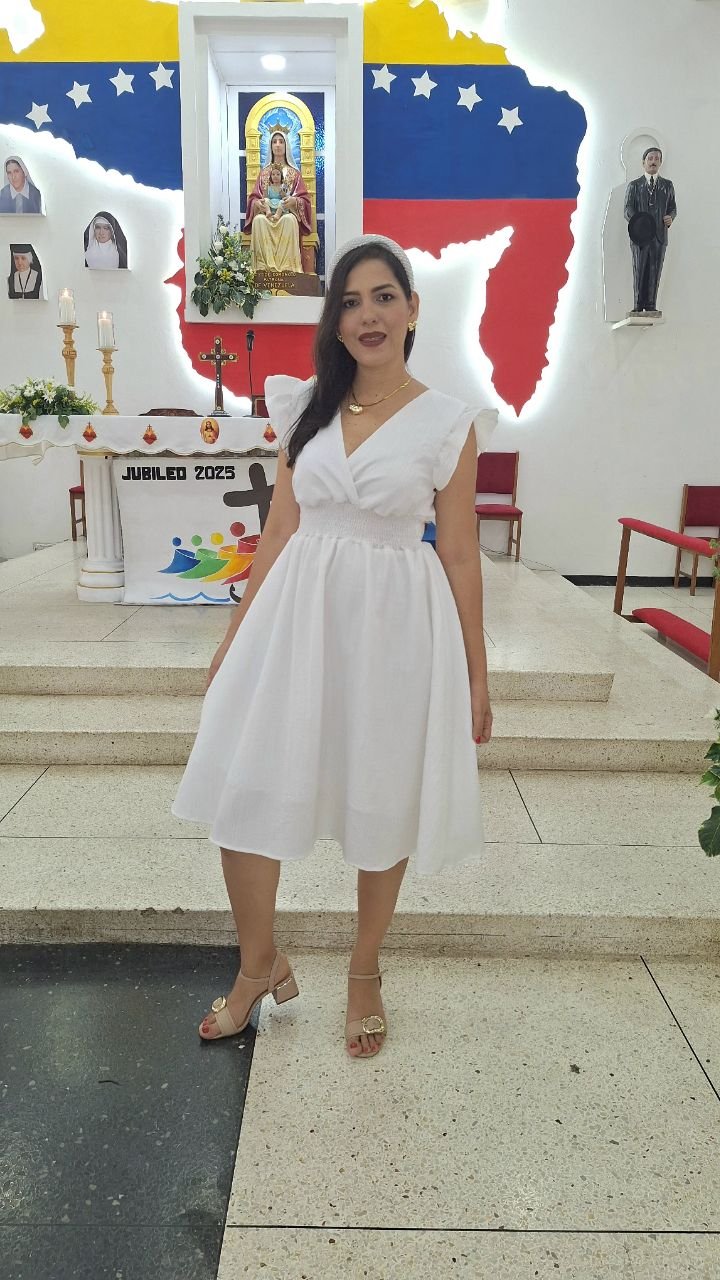
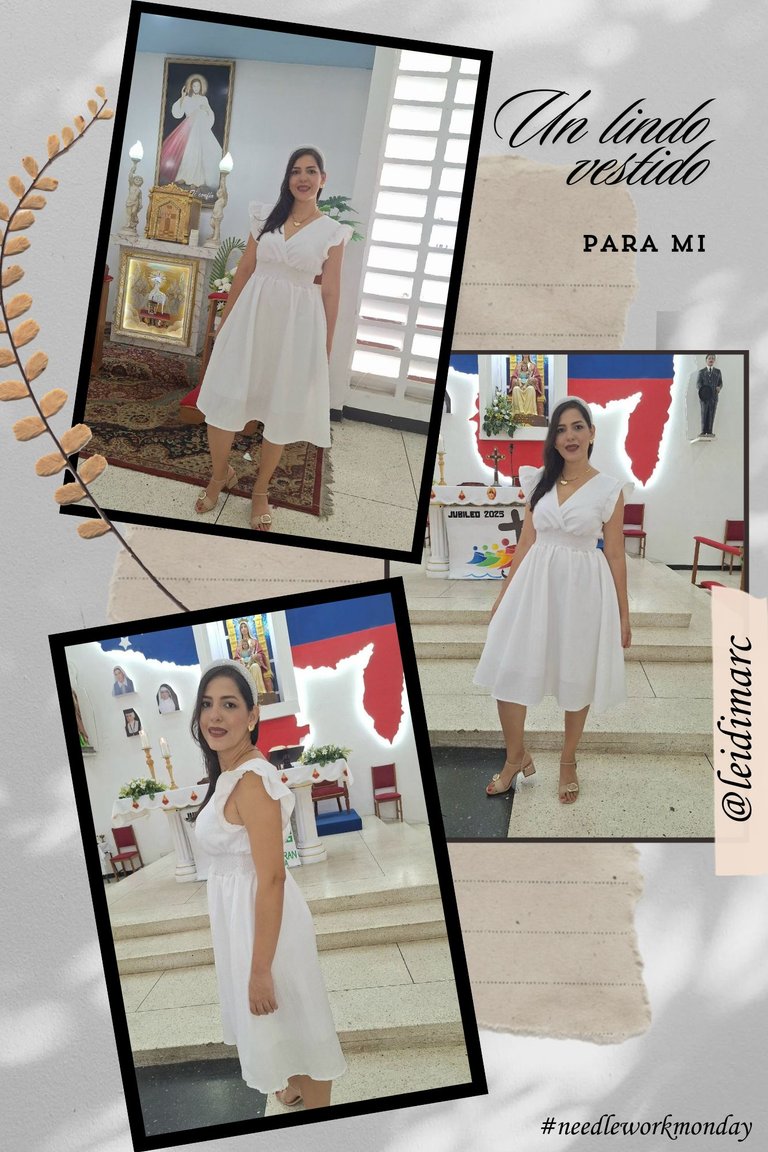
Y así de bonito me quedó mi vestido. Por aquí unas fotos en la iglesia en donde hicieron la primera comunión. Algo que no me gustó mucho fue que la falda se veía demasiado fruncida. Para la próxima, no extiendo tanto la parte de la cintura, esto también hace ver un poco grande la parte del busto. En mi defensa seguí todas las instrucciones para hacer el patrón.
Pero con base en esta primera experiencia, puedo hacer mis propias modificaciones para la próxima vez que utilice este tipo de patrón. Lo importante es que cada día aprendo a hacer más patrones, que en la costura, es una de las partes que más me gusta, no sé parte tanto el hilo como cuando estoy cociendo, que es algo que me estresante un poco, ya que me quita tiempo.
Bueno, amigos, esto es todo por hoy, quedo pendiente con otros proyectos que tengo que mostrarles, ando en deuda y espero cada lunes para mostrarles algo de mis creaciones. Gracias por su visita.

A beautiful dress for me
Greetings and blessings, my lovely people at @needleworkmonday. It's a pleasure to visit you, I hope you started the week with enthusiasm and joy that we will do many good and beautiful things. For my part, I'm working on a project with fabrics, but it's not clothing. I'll be showing you soon.
Today I'm going to show you how I made a pretty dress for myself. I made it to wear on the day of my princess @arianna's communion and my husband's. By the way, I'll show you later how what I made for her turned out.
I chose this model because it looked easy to make and I wanted to learn how to make an empire waist pattern. I used a very pretty, cool fabric with texture in an oyster white color. I also used another white fabric for the lining. I used two types of fabric for the lining. It doesn't have zippers or buttons, but it does have elastic thread.
I used my basic blouse pattern and transformed it into an empire waist. I didn't have much paper, so I was piecing it together here and there, hehehe, but I achieved my goal of making this new pattern.
Then I marked it on the fabric with my chalk, and then cut both the main fabric and the linings for the blouse and the skirt. By the way, this pattern ended up looking like a skeleton from all the piecing. I also cut out the waistband and the small sleeves.
Then I started sewing each of the pieces, first the blouse with its lining, as seen in the pictures. To make the sleeves, I first made a hem, gathered it with a double seam, and then attached it to the shoulders.
Then I faced the first and only challenge in this project: sewing the elastic seam for the first time. Luckily, I did the winding right, but like all the pieces, the waistband had a lining. When sewing the two fabrics with elastic thread, they didn't stick together, meaning I didn't get the desired effect when using elastic thread.
I spent quite a while practicing and couldn't get it right. What I had to do was unpick the lining and sew with elastic thread only on the main fabric, and finally, it turned out really nice. Although the lines weren't quite straight, I had to refill the spool several times.
Then I sewed the skirt part, attached it to the waistband, and my dress was ready. Although I thought I would do it faster, it took me two days, but despite everything, it's the fastest I've ever done it and without so many setbacks.
And this is how pretty my dress turned out. Here are some photos at the church where they had their first communion. Something I didn't like very much was that the skirt looked too gathered. Next time, I won't extend the waist part so much, as this also makes the bust part look a little big. In my defense, I followed all the instructions for making the pattern.
But based on this first experience, I can make my own modifications for the next time I use this type of pattern. The important thing is that every day I learn to make more patterns, which is one of the parts of sewing that I like the most. I don't like cutting the thread as much as I like sewing, which is something that stresses me out a little, since it takes time away from me.
Well, friends, that's all for today. I still have other projects to show you, I owe you, and I look forward to every Monday to show you some of my creations. Thank you for visiting.
Mi blog es familiar, de mi día a día, en donde puedo subir fotos de niños u otras personas de mi entorno, NO autorizo a usar mis fotografías sin mi autorización.
My blog is a family blog, of my daily life, where I can upload photos of children or other people around me, I do NOT authorize you to use my photos without my authorization.
Dispositivo | Device | Samsung Galaxy A54
Fotos editadas en: |Photos edited in | CC Express for Picsart / Canva
Separadores hechos en | Separators made in | CC Express for Samsung
Traducción con | Translation with| DeepL