Splinterlands is one of the most popular and strategic blockchain games of our time where every battle is a test of your intelligence. In this game, winning is not only guaranteed by having strong cards, but also by determining which card to use in which situation and how to position the cards. Today I will discuss with you in detail about one of my most memorable battles where I was able to defeat many strong opponents through my strategy.

This battle was basically a Nidhogg Summoner battle where both sides used the same summoner but there was a huge difference in the level of our summoners. My summoner was only level one while my opponent's Recount summoner was level three. According to the rules of the game, a level three summoner means that the strength and power of his cards were much higher than mine. However, in the end, I won this battle due to my correct card selection and positioning.

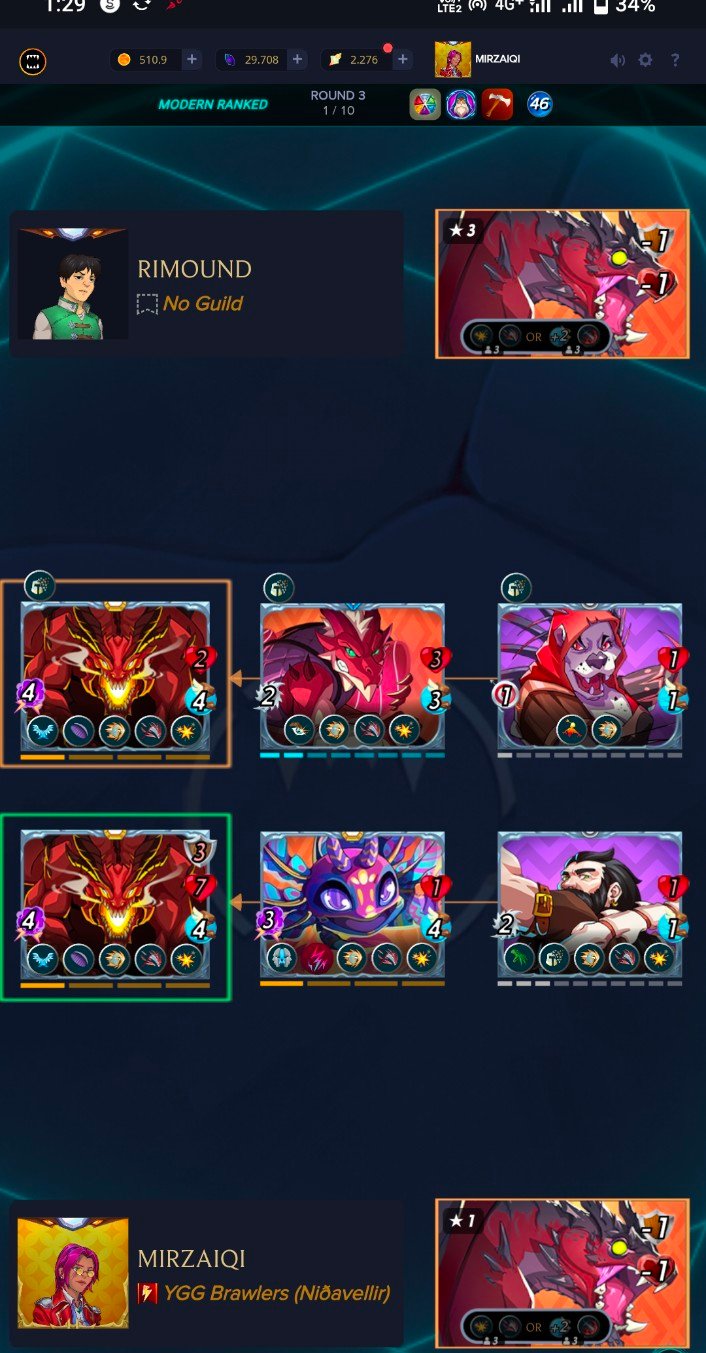
The battle was for 46 mana which was a pretty good budget for using big cards. There were three special rules or battle rules for this fight that made the game more challenging. The first rule was Taking Sides which meant that we could not use any neutral units in this fight. The second rule was Outsider which allowed us to use a special wild unit for our team.

And the third and most important rule was Mili Mayhem. As a result of this rule, all the melee attacking units were able to directly hit the opponent from any position in the team. I arranged my entire team with this rule in mind because I knew that if there was no proper defense and counterattack system in the Mili Mayhem rule, it would be impossible to win.
I placed the Cursed Windeku card in the first position of my team. The main reason for choosing this card was its Thorns ability. In the Mili Mayhem rule, whenever the opponent melee attacks this card of mine, the opponent will take damage due to the Thorns ability. As a result, my card not only acted as a shield but also played a major role in weakening the opponent.

In the second position, I placed a powerful dragon card called Rage. On the one hand, this card deals magic damage, on the other hand, its void ability protects it from the opponent's magic attacks. In the third position, there was Calamity, which is a very important magic card. With its electrified ability, it was able to deal damage every round, which helped turn the tide of the battle. In the fourth position, I used the Grim Bonewhip card, which I took advantage of the Outsider rule to take part in the team. The rust ability of this card was one of the main reasons for my victory. It reduced the armor of all the opponent's cards by half, as a result of which my attacks were able to directly hit the opponent's health.
Towards the last position, I placed Arakni Weaver, which was the most important for maintaining the healing or vitality of our team. With its Corrupted Healing ability, it was giving a huge amount of health back to my team's other cards every round, making it difficult for my opponent to kill my cards even after trying hard.
When the fight started, in round 1, the opponent's cards were quite strong, but their primary protection or armor was completely destroyed due to Grim Bonewhip's Rust ability. As a summoner, Nidhogg reduced both their armor and health, which made the battle environment even more dangerous. Due to the Melee Mayhem, the cards on both teams were jumping on each other. However, my team was in a pretty strong position at the beginning due to my position and the healing support of Arakni Weaver.
The fight became even more intense in round 2. While the opponent's big cards were hitting my Cursed Windeku, they themselves were also taking damage due to Thorns. At this point, my back row magic attackers, Rage and Calamity, were constantly attacking the opponent's important cards. The excellent balance of cards in my team stood like a mountain in the face of the opponent's level 3 power.
By round 3, it was clear that the opponent's main attacking cards were slowly losing their power. This was due to my team's regular healing and the opponent's lack of armor. When using Nidhogg Summoner, it is very important how you coordinate your attacks.

My team's outsider card Grim Bonewhip not only reduced armor but also kept the opponent busy with its attacks. On the other hand, when high damage cards like Rage were doing magic hits one after another, the advantages of the opponent's level 3 summoner were no longer useful. At this stage of the game, I realized that my chances of winning were much higher now. While the opponent was losing their units one by one, almost all the cards on my team were staying healthy thanks to the healing.
When the fight reached the last round, i.e. round 4, the opponent had only a few weak cards left. My dragon and melee units combined to launch a final attack on them. Despite having a level 3 summoner, the opponent was defeated by my level 1 summoner and better card selection. This win taught me that winning in Splinterlands is more about understanding the rules and building a balanced team than card level. In particular, the correct use of the Mili Mayhem and Outsider rules gave me this incredible victory today.
It was because of my proper positioning and healing support that I was able to survive this long fight and defeat my opponent. At the end of the day, it was a perfectly planned win that made me more confident in this game.
My references:-https://splinterlands.com/register?ref=mirzaiqi

